
بسم الله الرحمن الرحيم
In the name of Allah, the Most Gracious, the Most Merciful
It’s been a long time since I updated my personal website—not because I didn’t have content to add (though that’s usually the case!), but because the process of adding content was annoying and exhausting.
Everything was done manually:
I’d open my code editor, create a Markdown file, place it in the content folder inside the Astro project, search for images, add them manually to the public/ folder, and write the paths manually in each blog post or project.
It was a tiring, boring process that took more time than it was worth.
The funny part is that I’ve always known the solution was to use a content management system (CMS).
But, as usual, procrastination and laziness won.
Why Not Use WordPress for Content Management?
I had used WordPress before as a Headless CMS. While it has great content management capabilities, I believe it’s more suitable for large websites. I needed something simpler, faster, and easier to set up and use.
While reading Astro’s technical documentation, I stumbled across a familiar name: Strapi. I had come across it several times while randomly browsing the web. I quickly skimmed through its documentation and how to use it, and I decided to try it out given its flexibility and ease of use.
What Is Strapi and Why Did I Choose It?
Strapi is an open-source CMS built with Node.js. It’s highly customizable, powerful as a Headless CMS, and even offers a cloud hosting option.
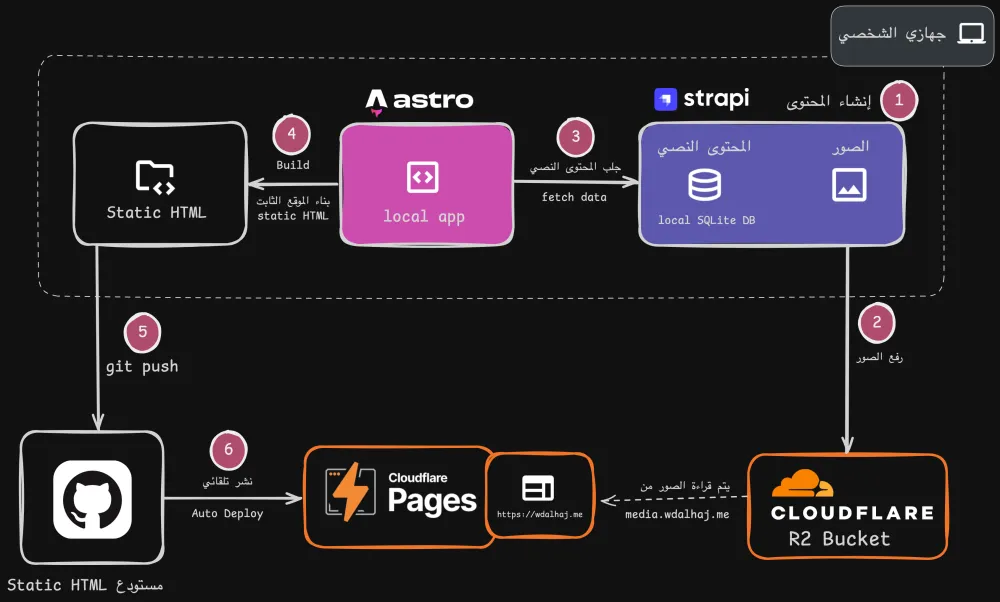
I installed it locally and created collections for my blog posts and projects using the Content-Type Builder, then started entering the text and media content.
I didn’t link it to every page on the site—just the sections that are updated regularly, like blog posts and projects.
Integrating Strapi with Astro
After setting up Strapi, I connected Astro to Strapi’s API using fetch to read and display the content on the site.
Everything worked perfectly… until the image problem showed up.
By default, Strapi stores images in the public/uploads folder on the local system, which means Astro can’t access them during the build process on the Cloudflare platform.
The Solution? Cloudflare R2
I’ve always admired Cloudflare and the services it provides. Fortunately, I found a ready-made plugin called Strapi Cloudflare R2, which uploads images directly to an R2 bucket on Cloudflare and stores the image URLs in Strapi.
I created an R2 bucket and linked it to the subdomain media.wdalhaj.me, so images are now served from https://media.wdalhaj.me and pulled directly from Cloudflare.
The Site Build & Deployment Problem
Another issue arose when I tried to deploy the site using Cloudflare Pages. Astro couldn’t access the Strapi API during the build phase because Strapi was only running locally on localhost:1337.
The Simple Solution:
- I build the site locally using
astro build, which generates the HTML files and stores them in thedistfolder. - I then copy the generated
distfolder to another folder outside the Astro project. - I push that folder to GitHub.
- It then gets deployed automatically to Cloudflare Pages using CI/CD.
I added these steps to the Astro build command so the process is fully automated. Here’s the script in package.json that does it all:
"build":  "
astro check &&
astro build &&
cp -Rf dist/* ../wdalhaj-static &&
cd ../wdalhaj-static &&
(git diff --quiet && echo 'No changes' || (git add . && git commit -m \"Deploy $(date +'%Y-%m-%d %H:%M:%S')\" && git push))
"
And the Final Result?
- I now have a static, fast website built entirely from dynamic content managed through a convenient dashboard.
- No need to manually upload files or write image links myself.
- Content appears within seconds after any update.
Conclusion
First Conclusion: Truthfully, I don't regret not using a CMS from the start because the manual work provided some experience, and overcomplicating the plan initially might have been a barrier to starting the project in the first place.
Second Conclusion: Forget the first conclusion! Start correctly, research best practices and development methods, and plan properly from the beginning!